With the release of Windows 10, taking a screen shot just got a whole lot easier. The best way is actually using the Snipping Tool that’s built in to the operating system itself. You do not need a 3rd party application.
With the “Snipping Tool” you can now easily take a screenshot and save it or email it with a few clicks. No more pressing Print Screen, opening MS Paint, Photoshop or whatever you prefer, pasting it in and cropping it. You can do it all in seconds. This is a huge relief as I take multiple screenshots a day, or even hour.

1) To open the Snipping Tool go to Start Menu > All Programs > Accessories and you will find it in there.
I suggest right clicking on the icon and selecting Pin To Start Menu so that it is easily accessible in the future. I needed to do that because I use it constantly.
An even quicker method of accessing the screenshot tool is press the Windows Key and simply start typing snipping. I use it so often after I hit S, it shows up. I literally just press Windows Key, S, Enter and it’s there.

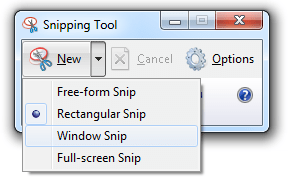
2) From there you can simply drag a square around what you would like to screenshot or you can use some custom options. To access the options click on the New Menu.

Free-form snip. To draw irregular shapes and lines.
Rectangular snip. Draw a custom and precise line by dragging the cursor around an area to form a rectangle or square.
Window Snip. Capture the current window or dialog box in a snip.
Full-screen snip. Capture the entire screen, such as desktop background.
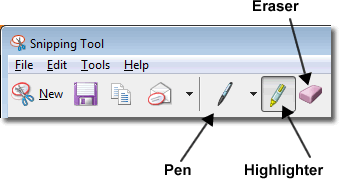
3) Add annotations or highlight if you would like to.

4) Save or send in email file. They make it very easy. You’re done! You have no successfully taken a screenshot in a few simple steps without the use of multiple applications and cropping.
A hint with the good old “prt scr” button. If you only want to capture a screenshot of the current window and not your entire desktop is you can hold the alt key while pressing prt scrn.