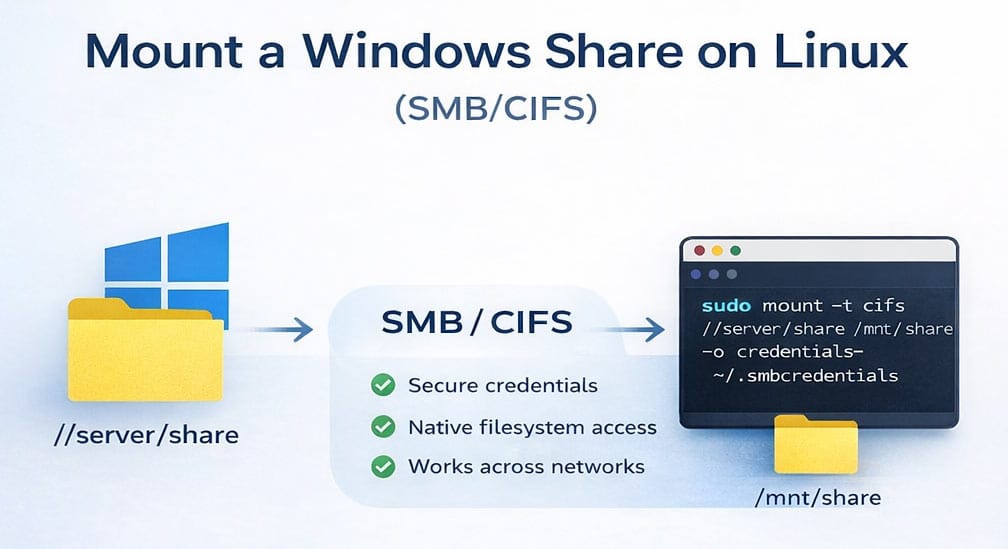
Mount Linux (SMB/CIFS) from Windows or NAS
Quick Answer: To mount a Windows share on Linux, install cifs-utils, create a mount point, store credentials securely, and run a mount -t cifs command.
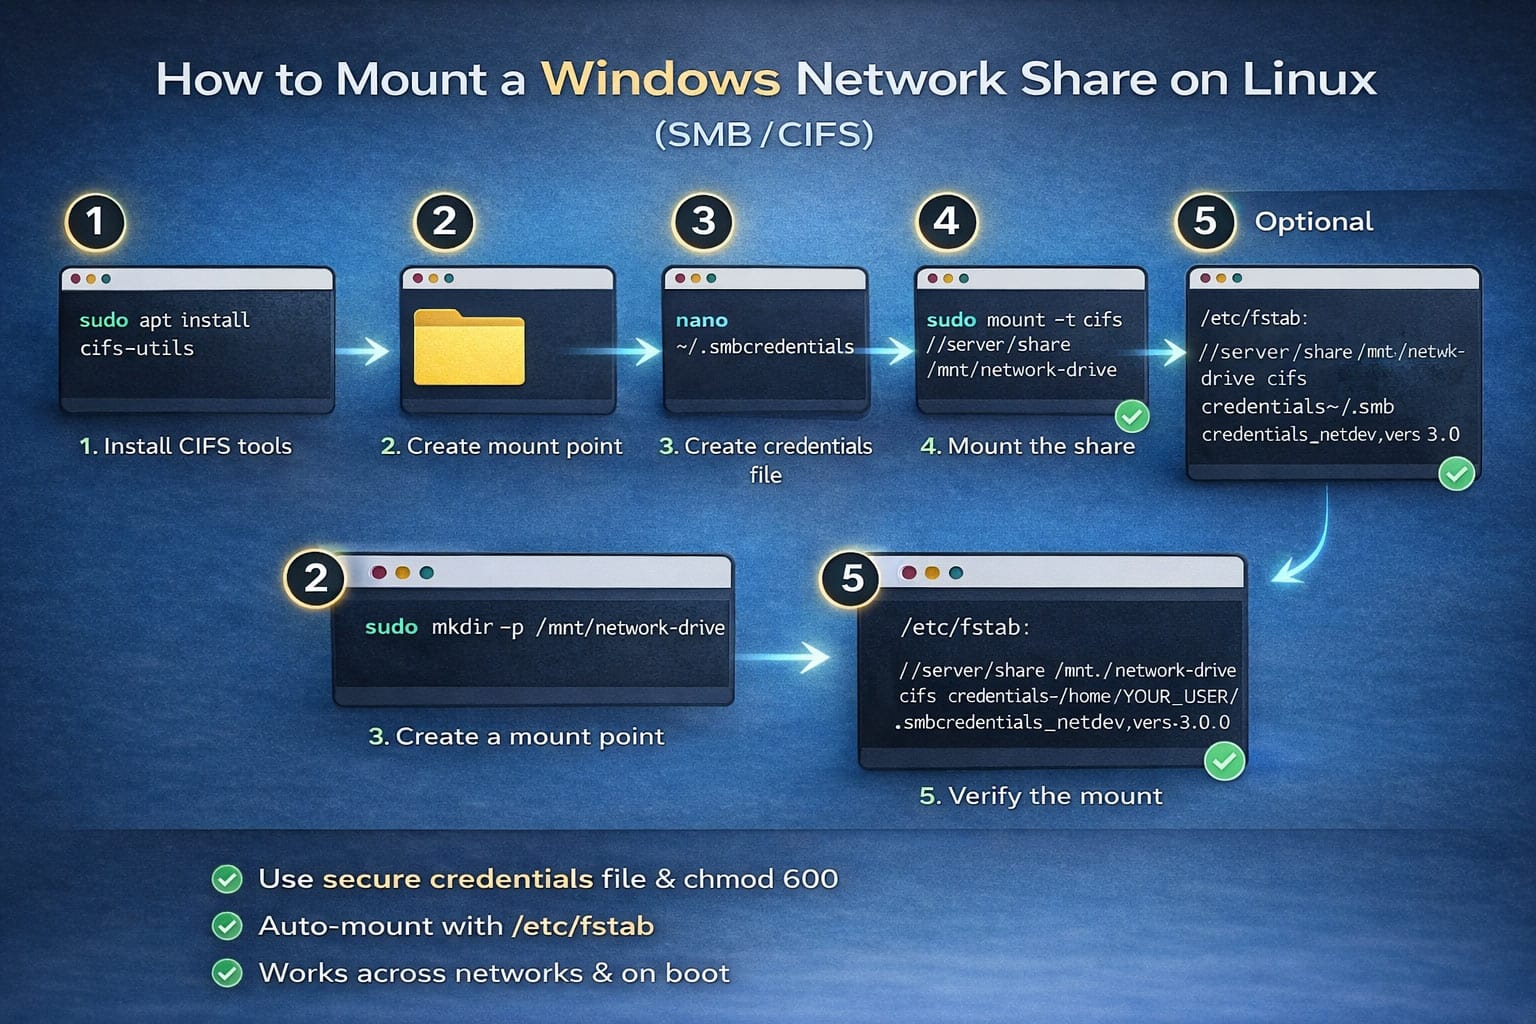
Quick Steps ⚡
- Install CIFS tools
- Create a mount directory
- Create a credentials file
- Run the mount command
- (Optional) Add to fstab for auto-mount
Step 1: Install Required Package 🔧
sudo apt update
sudo apt install cifs-utils
On RHEL/CentOS/Fedora:
sudo dnf install cifs-utilsStep 2: Create a Mount Point 📁
You may name the “network-drive” whatever you prefer as long as you use the name consistently in following steps.
sudo mkdir -p /mnt/network-driveStep 3: Create Credentials File 🔐
nano ~/.smbcredentialsAdd: Use your case sensitive logon credentials
username=your_username
password=your_password
Secure it:
chmod 600 ~/.smbcredentialsStep 4: Mount the Windows Share 🔗
You must have your server IP Address and file path for this step.
sudo mount -t cifs //SERVER_IP/SHARE_NAME /mnt/network-drive \
-o credentials=~/.smbcredentials,vers=3.0
Example:
sudo mount -t cifs //192.168.1.143/shared-folder /mnt/network-drive \
-o credentials=~/.smbcredentials,vers=3.0
Step 5: Verify the Mount ✅
df -hor
ls /mnt/network-driveAuto-Mount on Boot (fstab) ♻️
sudo nano /etc/fstabAdd:
//SERVER_IP/SHARE_NAME /mnt/network-drive cifs credentials=/home/YOUR_USER/.smbcredentials,_netdev,vers=3.0 0 0Apply:
sudo mount -aTroubleshooting ⚠️
Permission Denied
- Check username and password
- Verify Windows share permissions
Mount Error (95)
vers=2.1Host is Down
- Check network connection
- Verify server IP
Security Best Practices 🔒
- Use a credentials file (never plain text in command)
- Set permissions to
600 - Avoid storing credentials in root unless necessary
FAQ ❓
What is CIFS in Linux?
CIFS (Common Internet File System) is the protocol used to access Windows shared folders from Linux systems.
Do I need sudo to mount a Windows share?
Yes, mounting typically requires root privileges unless configured otherwise.
How do I auto-mount a network drive in Linux?
Add the mount entry to /etc/fstab with the _netdev option.
Why is my SMB mount failing?
Common causes include missing cifs-utils, incorrect credentials, wrong SMB version, or network issues.
Summary 🧠
Mounting a Windows share on Linux involves installing CIFS tools, creating a mount point, securely storing credentials, and running a mount command. For persistent setups, configure fstab.
The following information are the same steps in a different visual format in order to help readers fully understand if there is something you missed in the guide above.
We do this because sometimes just looking at something from a different angle is all it takes to light the bulb and complete the task.
Quick Easy No Fluff Network Mount Steps
This simple guide shows the cleanest way to mount a Windows shared folder or NAS(Network Attached Storage) share so it appears like a normal folder on your Linux desktop.
As a lifelong Windows user now running Linux on my spare computer for AI self hosting, I have run into many problems and this was one of them.
When trying to connect to the smb:// file share it was rejecting my username and password that I was positive was right. After following all of these steps it did work.
I am using Linux Mint(Mate) and ran into countless issues doing such a simple task so after I figured it all out, I made this easy to follow copy-paste guide for you.
Step 1: Create a Secure Credentials File
Your going to need to pass the login credentials from your Linux computer to your Windows PC or Network Attached Storage so make sure you know your username and password. Now we create a file with that information.
YOUR_WINDOWS_USERNAME and YOUR_WINDOWS_PASSWORD with your actual Windows login details.nano ~/.smbcredentialsusername=YOUR_WINDOWS_USERNAME
password=YOUR_ACTUAL_PASSWORDchmod 600 ~/.smbcredentialsStep 2: Create the Mount Point and Mount the Share
First, find the IP address of your Windows computer or Network Attached Storage (run ipconfig on Windows and note the IPv4 address).
IP Address and Server-Path to put here.Drive-Name: You get to make this one up for your local Linux mounted drive.
Drive-Name Must remain constant in following steps.sudo mkdir -p /mnt/Drive-Namesudo apt install cifs-utilssudo mount -t cifs //192.168.1.XX/Server-Path /mnt/Drive-Name \
-o credentials=~/.smbcredentials,vers=3.0Test it:
ls /mnt/Drive-NameStep 3: Create a Desktop Shortcut
The easiest way:
- Open your file manager and go to /mnt/Drive-Name
- Hold down Ctrl + Shift keys
- Click and drag from inside the Drive-Name folder onto your desktop
- Choose “Link Here” when prompted
To change the icon:
- Right-click the new shortcut on your desktop → Properties
- Click the small icon at the top-left
- Choose a better icon (e.g., folder-remote or any you like)
Step 4: Make It Mount Automatically on Boot (Optional but Recommended)
Edit the fstab file:
sudo nano /etc/fstabAdd this line at the very bottom:
//192.168.1.XX/Server-Path /mnt/Drive-Name cifs credentials=/home/$(whoami)/.smbcredentials,vers=3.0,_netdev,nofail,x-systemd.automount 0 0Save and exit (Ctrl+O → Enter → Ctrl+X in nano).
Test the fstab entry:
sudo mount -aIf no errors appear, you’re done. The share will now mount automatically after every reboot.
Done! You now have a clean desktop shortcut to your Windows or Network share that behaves like a normal folder.